If you’ve ever admired glossy, chip-resistant nails that stay flawless for weeks, chances are you were looking at hard gel nails. This nail enhancement has become a go-to choice for salon professionals and beauty lovers who want both style and strength. Unlike traditional nail polish that chips in days or acrylics that can sometimes feel heavy, hard gel offers a perfect balance of durability, flexibility, and elegance.
In this comprehensive guide, you’ll learn exactly what hard gel is, how it compares with other nail systems, its benefits, application methods, removal techniques, costs, and the latest design trends. Whether you’re considering hard gel for the first time or you’re a professional looking to refine your skills, this article has you covered.
What is Hard Gel?
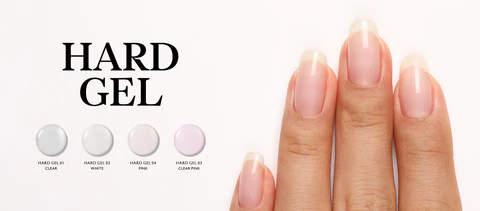
Hard gel is a nail enhancement product that cures under UV or LED light. Once cured, it creates a durable, non porous layer that strengthens natural nails or extends their length. Unlike soft gel polish, which can be soaked off with acetone, hard gel is non-porous and must be filed down for removal.
Its primary use is to build strong overlays and sculpt extensions. Because of its lightweight feel and glassy finish, it’s often chosen by clients who want nails that look natural yet last much longer than regular polish.
Hard gel belongs to the same family as builder gels but has a slightly different consistency and strength profile, making it especially reliable for longer nail shapes.
Hard Gel vs. Acrylic Nails
Clients often ask: Should I choose hard gel or acrylic? Both are popular, but they serve different needs.
| Feature | Hard Gel Nails | Acrylic Nails |
| Durability | Strong and flexible; resists cracks | Very strong but more rigid |
| Weight | Lighter and natural-feeling | Thicker and heavier at times |
| Odor | Odorless or minimal | Strong chemical smell |
| Finish | Glossy, natural look | Can appear less natural if overbuilt |
| Removal | Filed down only | Soaked off or filed |
| Maintenance | Refill every 3 4 weeks | Refill every 2 3 weeks |
Key difference: Acrylics are unbeatable in raw strength, making them ideal for people who use their hands heavily. Hard gel, however, offers flexibility and a natural aesthetic that many find more comfortable.
Hard Gel vs. Builder Gel
The terms builder gel and hard gel often get mixed up. While they share similarities, they’re not identical.
- Hard Gel: Best for sculpted extensions and long-lasting overlays.
- Builder Gel: Typically used in a bottle, slightly softer, often chosen for overlays or short extensions.
- Similarities: Both require curing under a UV/LED lamp and offer strong adhesion.
If you want very strong, sculpted nails, hard gel tends to be the better option. For quick, lightweight overlays on natural nails, builder gel may be enough.
Benefits
Hard gel nails are more than just pretty they’re practical. Here’s why they’re winning over nail enthusiasts:
- Exceptional durability: Stays intact for up to 4 weeks without chips.
- Lightweight feel: More comfortable than acrylics for many wearers.
- High-gloss finish: Looks polished without constant upkeep.
- Low odor application: Unlike acrylic, there’s no strong smell.
- Flexible strength: Less brittle, reducing the risk of cracks.
- Perfect for nail art: Encapsulated glitter, foils, or 3D art last longer in hard gel.
“Hard gel nails give my clients the confidence to go about their day without worrying about chips or breaks.”Professional nail artist, Los Angeles.
How to Apply
The beauty of hard gel lies in its application process, which allows nail techs to sculpt with precision. Here’s a breakdown:
Tools Needed:
- Nail file and buffer
- Cuticle pusher
- Nail dehydrator and primer
- Hard gel (clear, nude, or colored)
- Nail forms or tips (for extensions)
- UV/LED curing lamp
- Top coat and brush
Application Process:
- Prep the natural nail: Clean, shape, push back cuticles, and buff.
- Apply primer/dehydrator: Ensures better adhesion.
- Base layer: Apply a thin base coat and cure under the lamp.
- Build structure: Apply hard gel in thin layers, curing each one. Add nail forms if extending.
- Shape and file: Once hardened, refine the shape with a file.
- Seal with top coat: Finish with shine and protection.
Pro Tip: Keep layers thin to avoid bulkiness and ensure proper curing. Always cap the free edge to reduce lifting.
Designs and Trends
Hard is a perfect medium for creativity. Some of the most in-demand designs include:
- French tips: Classic, clean, and timeless.
- Ombré fades: Blending soft pinks into whites or trendy pastels.
- Encapsulated glitter or florals: Adds depth and dimension.
- Matte finish hard nails: Chic and modern.
- Seasonal looks: Snowflakes in winter, florals in spring.
Fun fact: Ombré hard nails topped salon trend charts in 2025, with clients loving their elegant fade effect.
Caring
Maintenance is essential to keep your hard nails looking flawless.
Tips for Longer Wear:
- Refills: Every 3–4 weeks to keep nails strong and balanced.
- Moisturize daily: Cuticle oil prevents dryness.
- Wear gloves: Protect nails when cleaning or using chemicals.
- Avoid picking: Never peel hard off it damages the natural nail.
Mistakes to Avoid:
- Ignoring refills, leading to lifting or cracks.
- Using hard nails as tools to open things.
- Over filing during maintenance.
Removing Hard
Hard removal requires care. Unlike soft polish, hard gel does not dissolve in acetone.
Safe Removal Process:
- File down the bulk: Use a coarse file or e file.
- Switch to finer grit: To prevent overheating or nail damage.
- Leave a thin layer: Avoid over filing into the natural nail.
- Buff and hydrate: Smooth out and apply cuticle oil.
Professional removal is faster with an e file, while at home removal takes longer but is doable with patience.
Common Questions
Is hard gel safe for natural nails?
Yes, as long as application and removal are done correctly. Damage happens mostly when people peel or aggressively file off gel.
How long does hard gel last?
Most sets last 3 4 weeks depending on growth and care.
Can hard gel be refilled?
Absolutely. Hard is designed for refills, which makes it cost-effective.
Does hard gel damage nails more than acrylic?
No hard gel is often gentler because it’s more flexible and less likely to cause cracks.
What to Expect
Pricing depends on location, design complexity, and the salon’s reputation.
| Service Type | Average Cost (USD) |
| Full Set of Hard | $55–$85 |
| Hard Refills / Infills | $35–$55 |
| Nail Art Add-Ons | $5–$25+ |
Although slightly pricier than acrylics, hard nails deliver greater comfort and a natural look, making them worth the investment.
At Home
Want salon quality nails without leaving home? DIY hard gel kits are becoming popular.
Recommended Kits:
- Beetles Hard Gel Kit Affordable, includes UV lamp and multiple gels.
- Modelones Builder & Hard Gel Set Beginner friendly with clear instructions.
- Mia Secret Professional Kit A professional grade choice for serious DIY users.
DIY Pros:
- Save money in the long run.
- Try different designs at your own pace.
DIY Cons:
- Steeper learning curve.
- Risk of improper curing or shaping if rushed.
Expert Tips
- Always prep nails properly for maximum adhesion.
- Apply thin, even layers thick applications can cause curing issues.
- Pick a nail shape that complements your lifestyle (almond for elegance, square for practicality).
- Seal edges to avoid premature lifting.
- Take your time perfect nails are never rushed.
Final Thoughts
If you’re after nails that combine strength, beauty, and longevity, hard nails are an excellent choice. They offer a lighter feel than acrylics, last longer than soft, and open endless creative possibilities with nail art.
For clients, hard delivers confidence in knowing your manicure will last weeks without chips. For professionals, it offers a reliable product that clients keep coming back for. And for DIY enthusiasts, hard kits are now accessible enough to create salon quality results at home.
Bottom line: Hard nails are here to stay. They’re the future of nail enhancements flexible, glossy, and built to last.